This site has step by step instructions on how to build a racetrack poker table with whisper vinyl padded rails.
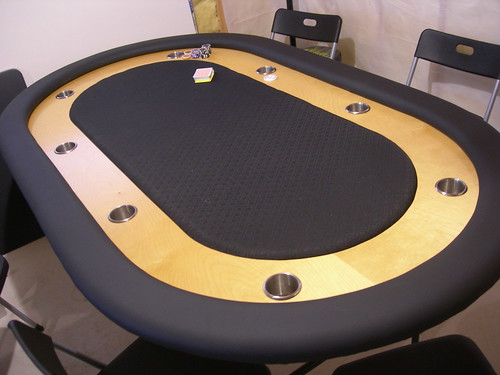

Step one in any project should always include careful planning (planning may be substituted by alcohol with mixed results). My plan was to build a high quality, free standing table with a wooden raceway, cup holders, raised whisper vinyl covered padded rail.
I prefer the raised center for a few reasons.
- It makes it easy to see what people are betting without painting on a bet-line.
- It helps contain spills.
- It looks badass.
Materials List
I used Whisper Vinyl wrapped on a custom removable rail. Pick it up here:
Whisper vinyl from your auto trim (also available at JoAnns or some other fabric store, if you have one nearby.)
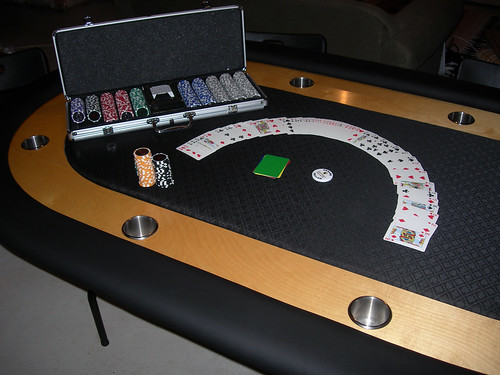
Playing surface from amazon:
Brybelly Polyester Suited Speed Cloth, 10-Feet, Black
The 3/8″ foam I used behind my playing surface was too thick for my taste. If I did it over I would use 1/4″ closed cell foam or better yet, neoprene. This is one at amazon is exactly what you need:
Last thing, When I build my padded rail, I’m not going to attach it to the table. I saw some at a poker store in the mall and they were not attached either. That should make it easier to clean.
Other materials:
2 Sheets Hardwood Plywood (birch 4 foot x 8 foot x 3/4″) 2 at $37.00 each.
2 Sheets Regular Plywood for the rails (4’x8′ x 1/2″) 2 2 at $28.00 each
Wood Glue: 1 for $3.50.
3M(TM) Super 77 Multipurpose Adhesive Spray, 10.7 Ounces (7716): 1 for $4.00.
Staples: 1 box for $3.87.
Polyurethane: 1 quart for $5.00.
2″ Foam Brush: 5 at $0.60 each.
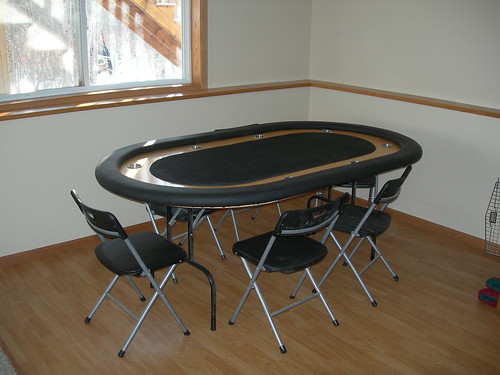
29″BLK FOLDING TABLE LEG (Ebco Tools APF-B): 1 for $18.95.
Amarine-made Stainless Steel Cup Drink Holder with Drain Marine Boat Rv Camper 9 $6.50 $58.50
hey i would like to know where to get the cup holders(SS) for the table. THANKS
I ordered them from casinosupply.com.
More details are available on my materials page.
I have been looking at a lot of home made tables as homework for building my own. I like your table with the vinyl rails and really like the whole design and finished look. I would really like to get a hold of some detailed plans/pictures to fill in some blanks.
Nice job!!
Update: thanks for adding all the detail!
hey i have a question, since you will end up only seeing the top piece of plywood, isn’t that the only one that needs to be like birch? i guess my question is why do you need the birch underneath also?
The birch plywood is a hardwood. So it makes the table more sturdy. If you’re aren’t worried about that and you want to save money, and weight, a regular piece of plywood will probably suffice.
thank you so much for the step by step 2 of my friends and i just finished this table with you step by step instructions, thank you so much it turned out great! we did the same color scheme and everything the only thing we really changed is under the hard plywood its particle board, it saved us some money and its holds up well! thanks again!
Josh
where were you able to find a 4×8 sheet of plywood, i cant find it anywhere
I got mine at Menards, but Home Depot, Lowes, and any local lumbar yard should have it.
What thickness plywood did you use for the base and the rails. It looks like 3/4″? Not sure?
Excellent table.
Yes, I used 3/4″ but I belive 1/2″ would work.
Love the table and plans. I have one question though. Is the 3/4″ birch thick enough to router in grooves for chip placments beside the drink holders or do you think it would weekin the table
were did you purches your folding legs at and do u have any step by step plans for your table your degsin is wonderful it looks great and you can fold it up and put it out of the way nice table
Menards is where I got the folding legs. If you dig around the site a bit you’ll find step by step instructions – as that’s all this site is.
one more quick question how much does the table weigh once it was all finished
if you are in an apartment that is confined, then folding tables would be very well suited for you ;,”
Many thanks for the detailed instructions! I built a couple tables and hosted a tourny. Everyone was in awe of the tables. I ended up making them w/10 seats. I added some chrome pin striping (http://www.autobarn.net/custom-chrome-trim-exterior-molding.html) around the inside of the raceway… it looks stellar. Thanks again!
Where would you recommend getting the foam from?